
Contents
16 Foot Garage Door Framing GarageDoorSalesNearme.Com | There are a few things to keep in mind when you are framing your garage door.
First of all, you need to measure the height and width of your garage door. This will allow you to know the correct framing length for your door. Next, you need to make sure the jambs and header are in place.
16 Foot Garage Door Framing
#Measure the width and height of your garage door
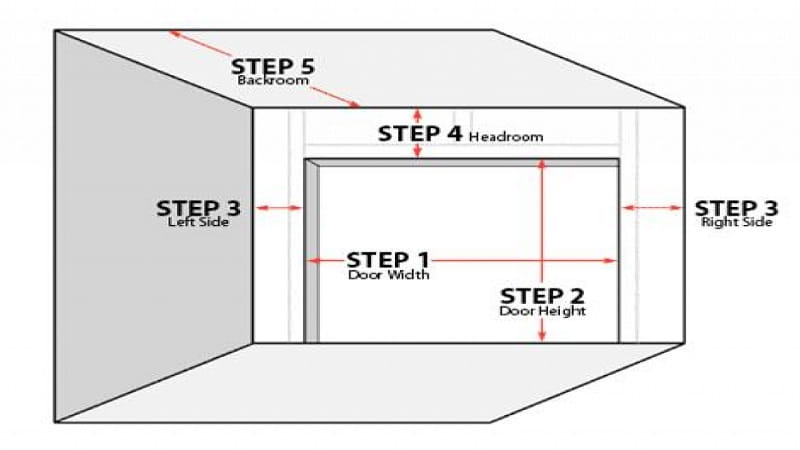
The first step in the process of measuring your new or existing garage door is to measure the width and height of your opening.
If you do not, you will not have an accurate measurement and could end up with a substandard door. There are several tools you can use to do this, but the most useful will be a 25 foot tape measure. A writing utensil and a notepad are other essential tools to have around.
You should also measure the headroom, which is the distance from the top of your garage door to the top of the ceiling. In order to do this, you will need to take your measurements inside the garage. This means you will need to avoid obstacles such as overhead storage boxes and access doors.
Another important factor to consider is the depth of your garage. It is necessary to provide a minimum of six inches of space for commercial doors with standard lifts. For residential doors, you will need to allow for a minimum of four inches of space.
Other factors to keep in mind are the side room and the ceiling. These are all important to the function of your garage door and the operation of your opener. Side room is necessary to ensure that you have enough room to close your door and open it again.
Measuring your garage door is not difficult. It will require only a few minutes and can save you time and money in the long run. Remember, if you are not sure which measurements to use, ask a professional. They will be able to help you with the best ones.
There are a few different things to remember in measuring your garage door, but if you follow the steps below you should be able to get a good idea of what your new door will look like.
Once you have your measurements, you can start shopping for a new garage door. Whether you choose to purchase a traditional garage door or a custom design, a quality door is a great investment. Using an inaccurate measurement can result in problems and extra fees.
One important thing to remember is that the measurements you measure will vary slightly. Different manufacturers will have varying tolerances. However, for most doors, you should be able to count on a minimum of 10 inches of side room.
While the actual door panel may be slightly smaller than the ordering size, you should still be able to use the rest of your opening to the best of your ability.
A single garage door will usually measure about 9 feet wide and 7 feet high. If you need a double garage door, you will need to add at least nine additional feet. Also, if you are installing a sectional door, be sure you have at least ten inches of clearance for the side tracks.
16 Foot Garage Door Framing
#Install the header

The header is an important part of a garage door framing project. In fact, the header is often thought of as a bridge that transfers weight from the door to the foundation of the structure.
It’s not uncommon to use a two by twelve lumber header to span a large opening. However, you’ll need to follow some guidelines if you want to get the job done right.
First, you’ll need to determine how wide you’ll need the header to be. For a standard garage door, the header should be at least 12 feet wide.
You should also measure the height from the top of the header to the ceiling of your garage. This is the height you’ll use to calculate the width of the framing.
Next, you’ll need to mark out where you’ll install the header. You’ll want to have it positioned properly to ensure that you have the proper alignment for the overhead door support.
Also, you’ll want to make sure the header is flush with the wall studs. If you don’t have a header, you can use PVC garage door jambs instead.
After you’ve made all the necessary measurements, you’ll want to cut out the door frame to fit the opening. Be sure to leave at least two inches of overhang on each side. Once you’ve got it trimmed out, you’ll need to secure it to the framing with 16 penny nails.
Before you start, you’ll need to remove any old siding or wall coverings. These items will need to be replaced before you can install a new door. You’ll also need to use a caulk to seal the threshold and prevent water from entering the building during heavy rain.
You’ll also need to mount a piece of 2×6 vertically in the center of the header. The center pad will help you secure the opener and springs. Your local garage door dealer can help you with this.
Finally, you’ll need to mount the overhead door support on the header. Depending on the type of overhead door you’ll be installing, you might need to install a jack stud or two. You’ll need to mount the support to the roof truss.
The most important part of a garage door header is that it provides support to the frame. You’ll want to make sure that you’re using a header that’s big enough to hold the weight of your garage door and springs. That doesn’t mean that you’ll have to beef up the entire thing. A smaller header might be just as effective.
As you’ll see, the best way to find the perfect header for your garage door framing is to do your research. By taking the time to measure the size of your door and your opening, you’ll be able to pick the right size and know what tools you’ll need to complete the job.
16 Foot Garage Door Framing
#Install the jambs

Having a garage door frame can be a quick and easy process. However, you must take into account the height of your jambs and the height of your header.
This will ensure that the door is properly installed. Also, be sure that the sides of your door frame have enough clearance to ensure that the door is not overbalanced.
It is important to use a good quality material for your framing. Ideally, it should be salt treated lumber. This will make the lumber more durable, and it will also help with painting the door.
You should not use any type of untreated lumber, as it will not last as long. If you do not have the time to paint your door, you can wrap it in aluminum for a clean, maintenance free finish.
Your rough opening should be at least 16 feet wide and 7 feet tall. In order to fit your door, you will need to subtract 2 inches from the opening. Then, divide the distance by two to determine the size of the side jambs and the header. Once these dimensions are determined, you can begin the framing.
Generally, a header is made of 2” thick lumber. In order for the header to be plumb, it must be level with the back jambs. Then, it will be attached to the side jambs.
To mount the header, you will use 16-penny framing nails. Be sure that the fasteners are in the correct places and that they will secure to the structural member.
Before you can begin installing your door, you will need to attach the header to the wall. In most cases, a 2×6 is used for the side jambs and the head jamb. Depending on the height of your door, you may need to trim the header, especially if the doors are very tall.
After the header is nailed in place, you will need to mount the bottom panel to the door. The bottom panel is then tacked into place with 10d nails.
Next, you will need to install the angle brackets. When you have done this, you should remove the locking pliers. With the locking pliers, you will be able to press the brackets securely to the jambs.
The next step is to install the side jambs. These should be cut to the proper height and left about one quarter inch above the concrete floor.
They should be flush with the interior studs. Ahead of the header, you will attach the side jambs to the header with framing nails.
Installing your door is very simple. All you have to do is follow the instructions carefully. If you do not follow the directions, you can potentially damage your door, or even hurt yourself. Whether you’re installing a door on your own or hiring a professional, be sure to read the instructions and follow them.


