
Contents
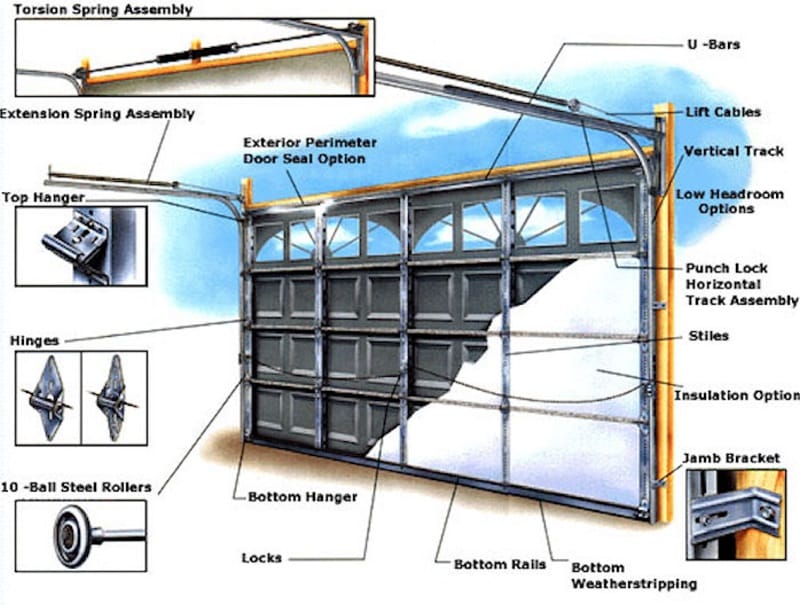
The Different Parts of a Garage Door Diagram GarageDoorSalesNearme.Com | The different parts of a garage door are mainly a spring, a counterbalance assembly, a hanger kit, a hinge, a track, and a roller.
When you are looking to repair your garage door, you will need to know all of the parts that make up this system. It is helpful to take the time to review this list, and learn the differences between each of the components.
The Different Parts of a Garage Door Diagram
#Tracks

The tracks of a garage door diagram help to guide the rollers of the door. Various types of doors have different tracks to accommodate their specific needs.
Some doors have vertical tracks only, while others use both horizontal and vertical tracks. In addition, the height of the garage and its roof pitch will affect the type of track that is used. Typically, the most common garage door tracks require at least 4.5 inches of headroom.
To repair a bent vertical track, you can use a large screwdriver to straighten it. A rubber mallet is also useful. Depending on the condition of the tracks, you may need to adjust or replace the bolts.
In addition, it is recommended to check the internal parts of the door. If you notice any signs of wear, you should immediately seek professional assistance. You can also take the time to lubricate the tracks. Often, lack of lubrication will cause inflexibility.
A horizontal track is a section of track that supports the weight of a garage door when it is pushed in a downward direction. This track has an extension portion that may also rise as high as the door itself.
The Different Parts of a Garage Door Diagram
#Rollers
If you are having trouble with your garage door, it’s a good idea to check out the rollers. These components are the most used part of your garage door. They can wear out prematurely, causing your door to come off track. Here’s how to check them for wear and damage.
Garage door rollers can be made of several different materials. The material you use will affect how long they last and how loud they make. Rollers that contain ball bearings tend to last longer than those that do not. Steel rollers are noisy, while nylon rollers are quieter.
Read More: Jackshaft Garage Door Openers
The material of a roller also determines its cost. Nylon rollers are more expensive than steel. Plastic rollers are less durable, and they are susceptible to cracking.
Ball bearings keep the rollers turning smoothly, and they help your garage door last longer. Lubrication is recommended for ball-bearing rollers, and should be performed every few months. Depending on how often you use your garage door, you may need to lubricate them more frequently.
Steel rollers require a little bit more maintenance than nylon. While lubrication will extend the life of your rollers, you’ll also need to inspect them regularly to ensure that they don’t wear out.
The Different Parts of a Garage Door Diagram
#Struts
If you have a garage door, you may want to consider adding struts to the door. These struts are made of metal and provide extra support. They can also provide a temporary fix for a damaged section. Struts are commonly a couple of inches shorter than the width of the door.
Adding a strut can give you some additional time before you need to replace a section of your garage door. Whether you decide to buy a replacement strut or have a professional do it, you will want to make sure that the strut meets your local safety standards.
The number of struts that you need for your door will depend on its size and design. Normally, residential doors will use two struts, and industrial doors will use three. You can find a strut in your local hardware store, but you should always consult a garage door expert before installing one.
Some insulated doors use polyurethane foam to resist flexing. Lightweight non-insulated doors are more prone to bowing than insulated ones. To increase your flexing resistance, you can install an 8-foot piece of angle iron at the bottom of the strut.
Residential doors will generally use reinforcement struts that are about 2.25 inches wide. They are secured with steel clips.
The Different Parts of a Garage Door Diagram
#Hanger kit
The garage door hanger kit is a plethora of parts that are preassembled. One of the benefits of this type of kit is that you won’t have to guess at which screws go where.
To name a few, the rear track hanger kit comprises two or three angled steel brackets. Aside from these hardware laden baubles, you’ll also be getting an eye bolt, a pair of stubby screws and a box of self-adhesive magnetic strips. It all adds up to a streamlined installation experience that’s sure to please.
As for the kit itself, it is a well-crafted package whose design is built to last. For a small investment, you’ll be getting an efficient garage door solution that will keep you and your family safe for many years to come.
Of course, that’s not to say you have to sacrifice style to functionality. In fact, the sleekness of this garage door solution will be the envy of the neighborhood.
One of the most important parts of the hanger kit is its bottom section. In addition to a box of screws, you’ll find an appropriately sized sheet of cardboard to protect you from the hazards of the unforgiving outdoors. This is where you’ll also find the aforementioned rubber weatherstripping.
#Counterbalance assembly
A counterbalance assembly is a specialized mechanism that supports the weight of a heavy object. It is akin to the drive shaft of a car, and includes a number of cables, bearing plates and cones. The most interesting component is the springs.
As you can see in the diagram above, a counterbalance assembly is a bit of a beast. In order to properly support the weight of a heavy object such as a garage door, a bit of extra space is required. This is where the torsion spring comes into play.
A counterbalance assembly is a humongous undertaking, and a number of steps are required before you can actually get to the actual lifting mechanism. From there you are looking at an array of cones and bearing plates and the springs that carry them.
Once you have the requisite parts you can then install the whole shebang. Before you go ripping it apart you may want to refer to the factory service manual for a few pointers.
Hopefully you have a counterbalance assembly that is in top notch condition. Whether you have a garage door or a heavy duty motor there is no doubt that a good counterbalance can make your life a lot easier.
#Extension springs
Extension springs are used to counterbalance the weight of a garage door. A door with broken extension springs will not open and close smoothly. This can cause injury or damage to the door.
Extension springs work by using the built-up energy in the wire to stretch the coils. The size of the wire determines how much pull it needs to exert.
Extension springs are typically used on smaller garage doors. They have a limited lifespan of about 10,000 cycles. These springs are not as durable as torsion springs, which last for 20,000 cycles.
When replacing an extension spring, the first step is to remove the spring from the door. Next, measure the length of the spring. If it is damaged, you will have to count the number of coils to calculate the exact length.
You should also measure the thickness of the wire. Normally, these wires are coated and oil-tempered. However, some extension springs are made of galvanized wire.
The next step is to replace the damaged cable. The cable will run from the bottom fixture to the upper horizontal tracks. It is then routed through both sets of pulleys. In addition to these cables, you will need to replace the spring end clips.


